c#ATM之登录篇
一共三个窗体,一个作为父窗体,另外两个设为子窗体。Form1为父窗体,Form2为子窗体,Form3为子窗体。
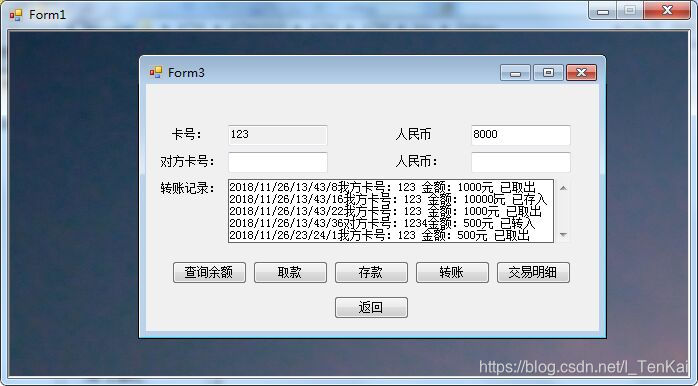
Form2作为修改密码的窗体,Form3作为ATM的功能实现。
先说一下思路:首先需要验证一下自己的账号和密码对不对,验证成功的话就进入下一个界面。先给你看数据库表怎么设计↓↓
表名:ox
先新建两个表↓
这是表DATA中的数据类型↓
这是表DATA中的内容↓
这是表USERR中的数据类型↑
这是表USERR中的内容↓
- 这是登录界面↓↓

代码如下↓↓
2.0//先添加一条命名空间
1 | using System.Data.SqlClient; |
2.1//先设这个窗体为父窗体
1 | public Form1() |
2.2//设置登录按钮的功能
1
2
3
4
5
6
7
8
9
10
11
12
13
14
15
16
17
18
19
20
21
22
23
24
25
26
27
28
29
30
31
32
33
34
35
36
37
38
39
40private void button1_Click(object sender, EventArgs e)
{
string count = "SERVER=.;DATABASE=OX;USER=SA;PWD=1;Integrated Security=True";//连接数据库字符串
//执行sql语句
string sql = "SELECT * FROM USERR WHERE ID='" + textBox1.Text.Trim() + "'";
SqlConnection con = new SqlConnection(count);
SqlCommand cmd = new SqlCommand(sql,con);
con.Open();
//读取数据库表中的内容
SqlDataReader dr = cmd.ExecuteReader();
if (dr.HasRows)
{
dr.Read();//有打开阅读就有关闭
if (textBox2.Text == dr["PWD"].ToString().Trim())//用dr来验证密码框输入的字符串和数据库中的字符串相不相等
{
MessageBox.Show("登录成功");
//——————登录成功后需要把这里控件隐藏起来—————
textBox1.Visible = false;
textBox2.Visible = false;
label1.Visible = false;
label2.Visible = false;
label3.Visible = false;
button1.Visible = false;
button2.Visible = false;
Form3 f3 = new Form3(textBox1.Text);//传递账号给f3
f3.MdiParent = this;//设为子窗体
f3.Show();
}
else
MessageBox.Show("请检查密码");
}
else
{
MessageBox.Show("请检查账号是否存在");
}
con.Close();
}
2.3//设置找回密码按钮的功能
1
2
3
4
5
6
7
8
9
10
11
12
13
14
15
16
17
18
private void button2_Click(object sender, EventArgs e)
{
Form2 f2 = new Form2(this);
this.button1.Visible = false;
this.button2.Visible = false;
this.textBox1.Visible = false;
this.textBox2.Visible = false;
this.label1.Visible = false;
this.label2.Visible = false;
this.label3.Visible = false;
f2.MdiParent = this;
f2.Show();
}
private void textBox2_TextChanged(object sender, EventArgs e)
{
textBox2.PasswordChar = '*';//设置密码框的掩码符
}
下一篇介绍 ATM之找回密码篇
最后一篇介绍:csharpATM之功能篇(存钱,取钱,转账,交易明细)完结篇